

Task Scheduler is the most powerful handy tool of Windows. It will help you to keep track of all history of important events in a scheduled task. Task Scheduler is an important application in the Windows operating system. It uses so easy and simple. It is a built-in application. Basically, it will help you to create a schedule of any events of task automatically. In this article, I will try to explain how to enable history in task scheduler faster.
For instance, if you need to create monthly bills, that case, you can create a task schedule for monthly bills with the schedule. After that, when you will create a complete schedule then you have to mention time. Then, it will be enabled automatically as per your scheduled time. When you put data to create a task schedule all these entries data are stored in the task scheduler event log.
For checking all these entries data you need to enable the history. At the right way, after creating a complete task schedule then checks it within a few minutes. You will be able to check the task schedule, view and clear the Task scheduler history on your Windows operating system. When the start and ended task execution,
Actually, the task history page means the recent activity page. It provides historical data of a particular task from previous runs files. It works excellent and is useful for tracking essential information on about run file of a task scheduler. Many kinds of information can track the task scheduler history page. For example, when the execution started and ended. Besides, you can also know how long time the task ran; also you will be able to understand whether it was running successfully or failed.
On the other hand, the task scheduler history by default is disabled. When you need to create a task schedule Enable it and just see the history perhaps it has been disabled. First of all, you should enable the Task scheduler history, when you create a complete task schedule. If you don’t enable the program it won’t recode your event in the task history. In this guide, let me explain and show how to enable History in Task Scheduler. To enable the task history successfully you should read the complete post with patience. You can also read how to move the downloads folder to another drive on Windows 10/7/8.
List of Contents
- Ten Ways How to Enable History in Task Scheduler Simply
- 1. Enable the Task Scheduler history by using the Start Menu
- 2. Enable the Task Scheduler History by using the Run Window
- 3. Enable the “Task Scheduler history” by “Wevtutil” Command
- 4. Enable the Task Scheduler History using the search box
- 5. Enable the Task Scheduler History by Computer Management
- 6. Enable the Task Scheduler History via Shortcut
- 7. Enable the Task Scheduler History by Control Panel
- 8. Enable the Task Scheduler History by Task Manager
- 9. Enable Task History Via PowerShell Command Prompt Windows
- 10. Enable the Task History by creating a shortcut.
What is Task Scheduler in Windows?
Task Scheduler is a work schedule for Microsoft Windows that is predefined launches computer programs or scripts over time. The key component is a named Windows service. Windows task Scheduler Infrastructure is a defining feature of Windows PowerShell launched with PowerShell v3.
Check Also: How to Create Desktop Shortcut for Any Game in Epic Games Launcher.
Ten Ways How to Enable History in Task Scheduler Simply
The Task scheduler is an important feature of windows. It is a handy feature of windows. It helps to run automated tasks on schedule. With Task Scheduler, you can run event programs periodically at a specific time. That’s why, you need to know how to enable history in the task scheduler. So, first of all, you will know how to Enable/enable it. If you want to get a complete guide on how to Enable/enable task scheduler, so read these simple 10 ways to enable history easily Using these 10 ways you will be able to “Enable Task History” easily in a short time.
1. Enable the Task Scheduler history by using the Start Menu
- First of all, go to the Start Menu and Open it.
- Then click on the “Start Menu” and find the “Windows Administrator Tool” folder option by scrolling down.
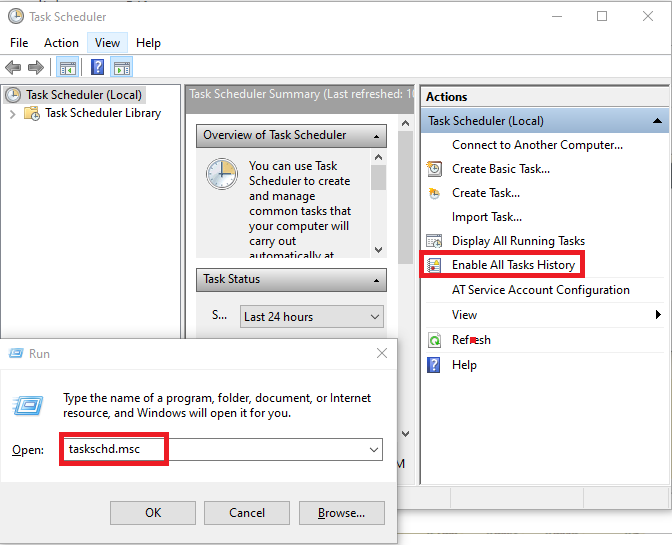
- Now you will get the shortcut for the “Task Scheduler” then the “Enable All Task History” option.

More Post: How to Reset iPhone 7 to Factory Setting [Four Top Picks]
2. Enable the Task Scheduler History by using the Run Window
You can also use the Run Windows option to find “Task Scheduler History”. Just follow our steps from below:
- In that case, hold the (Windows key + R) at a time.
- Automatically, you will discover a dialog box.
- Now type “taskschd.msc” in the dialog box.
- Finally, press the Enter key and get “Enable Task History”
- That’s it.
3. Enable the “Task Scheduler history” by “Wevtutil” Command
Here is how to enable task scheduler history using the “Wevtutil” command. Firstly, you need to open the Command prompt windows. Search the Command Prompt windows from the Start Menu then right-click on the “Wevtutil” option and then run it from the “Run as Administrator” option. Finally, type the following command in the Command Prompt window to enable the history of the task scheduler.
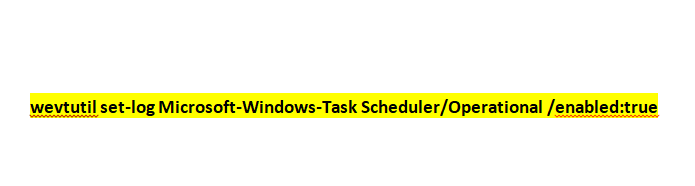
As soon as possible execute the command and then turn on Task scheduler history. It will keep a log of all actions during the task run.
Read More: Fixed Easily How To Uninstall Chromium Windows 10.
4. Enable the Task Scheduler History using the search box
If you want to get find quickly the Task Scheduler History you can follow our method four. It is so easy and simple to find Task History. Here is how”
- Otherwise, you can find the Task Schedule option very quickly using the search box on anyone Windows version, just Press “` Task Scheduler” in the Search Box then press the Enter key. Now you can go to “Task scheduler history” from the Task scheduler option.

5. Enable the Task Scheduler History by Computer Management
This is a simple and easy process for finding the “Task Scheduler History” from the Computer Management option. Just follow these steps are:
- First of go to Control Panel.
- Then all control Panel Items. Just select the small icon. After that, you will get many items only find the Administrative tools from these many items, and then click on the Administrative Tools. In this section, you will get the “Computer Management” shortcut.
- Nest, click on this option and find the “Enable all Task Scheduler History” from the Task Scheduler. That’s it.

Don’t Miss: How To Download Apps on Firestick Without Credit Card-3 Ways To Get Apps.
6. Enable the Task Scheduler History via Shortcut
Here you will get some shortcut options for your windows. If you want you can open these shortcuts and then choose the “Task Scheduler” shortcut option. You can also Enable Task Scheduler History from here.

7. Enable the Task Scheduler History by Control Panel
In this section, I am going to share another process of how to enable the “Task Scheduler History by Control Panel. Regardless of the version of Windows you are using just open the Control Panel>System and Security>Administrative Tools>Scheduler Tasks. Now click on the Scheduler Tasks and then will be open History.

8. Enable the Task Scheduler History by Task Manager
That is another simple procedure of how to enable the Task Scheduler History by Task Manager Option. So, let’s get started on how to Enable history. You will be able to open enable task history from Task Manager. To open the Task Manager Press (Crtl+Shift+Esc) keys together from your keyboard to get the Task Manager (Only for Windows 7 Version). On the other hand, for more Windows versions like Windows 10 and 8.1 follow the below steps:
- Open the Run Window just press these keys together(Windows Key+R)
- Next, you will get a dialog box just type the command (Task Manager) in the dialog box.
- Then see the Task Scheduler (Local) option.
- Here you will “Enable History” from here.
- That’s it.

Check Post: Why Is My Computer So Slow All Of A Sudden [How To Fix]
9. Enable Task History Via PowerShell Command Prompt Windows
Some peoples are like to use PowerShell Command prompt windows. If you are one of them, you should know how to launch the Task Scheduler from the PowerShell window. Firstly, open the PowerShell from your windows. If you don’t know just go Run Window then type in the dialog box (PowerShell) then press the Enter key. Then the PowerShell windows will be opened in several seconds. Then type the command (taskschd.msc) and then to enable Task history only press the enter key. That’s it.

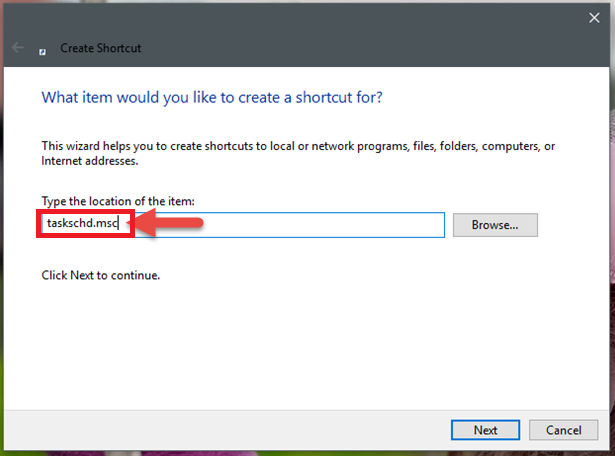
10. Enable the Task History by creating a shortcut.
This is the final Stop method of enabling the Task Scheduler History by creating a shortcut. You can keep the shortcut file on your desktop to get it quickly. If you follow the shortcut system just keep the shortcut file on your desktop screen. Then, easily enable Task history in a short time.
Final Verdict
That’s all. In this post, I tried to provide a complete guide about how to Enable History in Task Scheduler for all Windows versions. If you follow are our content, I hope you will be able to Enable Task history for all Windows versions. If you feel any problem just comment to us in the comment section about your issue. Also, if you like this post you can also read How to successfully connect Mac to Apple TV- easy way.