

Are you thinking about how to reset iPhone 7 to factory settings? If your answer is yes! Don’t worry about how to do it. We are going to share how to reset the iPhone and how to get rid of many kinds of problems on your iPhone. Reset or factory setting is the most Basic simple thing to troubleshooting steps for your iPhone 7. It can help your iPhone functioning and respond normally. By the reset or factory reset your iPhone will be before time neat and clean to uses.
Due to some reason you want to give reset it a fresh start and due to some small trouble, such as camera not open, keypad unresponsive, A button that decides to stop working also other odd problems. Reset to factory default settings in one way to repair problems. Through a complete recovery process will delete all kinds of iPhone data such as all documents, images, music, contrast, and all videos. It will be able to do a reset from the phone or using or iTunes.
You may learn from year all kinds of problem sole procedure for your iPhone such as reset, restore, reboot, restart, and recover. In this post, we are going to talk about how to reset iPhone 7 or iPhone 7 plus in some easy ways. These procedures also can apply to other iPhone models like iPhone 11/11 Pro (Max)/XS (Max)/XR/X/8/6/5/4.
Read Also: Snap Master VPN for PC- Download for Android, Windows, and Mac.
List of Contents
How To Reset iPhone 7 To Factory Settings On Your iPhone
After the factory setting your phone will be neat and clean. All kinds of data will remove from your phone. So be careful before factory setting. Your all-important data keep backup others phone or memory. This is a factory reset locked iPhone without iTunes. Go ahead to give factory reset step by step:
- Open Finder with MacOS Catalina 10.15 on a Mac.
- Open iTunes with macOS Mojave 10.14 or earlier, or on a PC on a Mac.
- Now connect your iPhone device with your PC.
- Follow more steps on your iPhone screen to complete this process. If you are asked to provide a passcode or trust this device. Then press your passcode, if you forgot your passcode you can take the help of apple.com official site.
- Choose your device when it appears in front of your computer. You won’t turn on any impassive device when you start this process. Follow our below steps to complete it.
- Click Restore from your device option. If you do sign in into the finder account, next you have to sign out before you can click Restore.
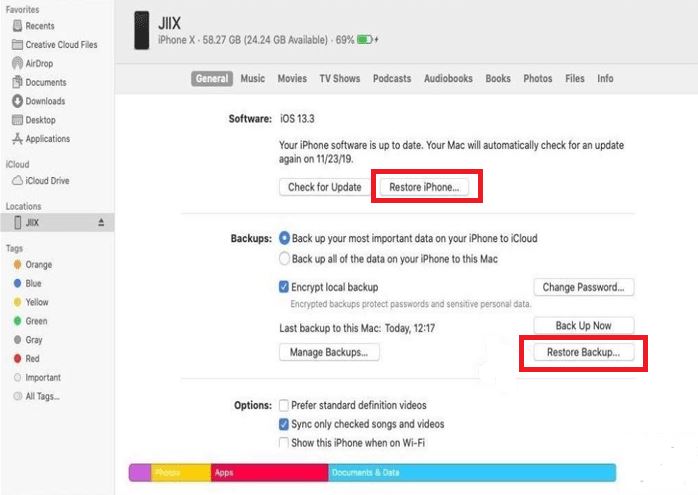
- Now click again to confirm the restore setting. Your computer removes from your iPhone and installs the latest iPhone 7 or iPhone 7 plus all data, iOS 10, iPad, or iPod software.
Check Also: Is Bluestacks Safe To Use For PC/Windows/Mac You Should Know
How to Factory Reset iPhone 7 plus
A factory reset removes or delete all kinds of data and reset all setting and install apps. It is highly for you before restore your phone pick up collect device all information then go ahead step by step.
- Tap Settings from your device’s home screen.
- Slight Scroll down and Tap General.
- You have to Scroll and tap Reset.
- Then Tap Remove All Content and Settings.
- Tap Erase iPhone.
- Finally, Tap Erase iPhone again.
- If a request to you, for entering the Apple ID Password, after press ID and password then tap Erase.
- Your device is reset working and ready to use wait few minutes.
- After factory reset now set information and all data and enjoy it.
Don’t Miss: How to Create Desktop Shortcut for Any Game in Epic Games Launcher
How to Reset iPhone 7/ Plus Via iTunes

Generally, you can give a simple restore your device before restoring the of course you have to take backup. You may save pick up your setting, email, and applications. For this complete process, you should accept a few more steps below.
1. Connect your iPhone with your computer device through cable and permit iTunes to begin it. A button for your phone will appear at the bottom of “Devices” in the upper-left corner of your screen. With this button, you’ll be able to see if it’s properly connected and acceptable. Then select the button.
2. If iTunes is set to sync while the device is connected normally, it will now begin data transfer. This is an extremely important step so that any newly added content, including any song or app you purchase and photos you’ve saved, will be stored. If iTunes does not start syncing automatically, do it now manually. Now, from the left pane of iTunes press on “Sync” button from the right of the “Summary” option.
3. When the sync is complete, return to the info page in iTunes. Now, notice two buttons from the middle of the main window. After that, click on the “Restore” button. Once you do so, iTunes will alert you that it will delete all the media and data restored to your iPhone in factory settings. After successfully synced, click the “Recovery Button” to begin the process.
4. iTunes will start the process automatically after clicking the “Restore” button a second time. On your iPhone screen, you will see several separate messages where iTunes tell you to remove the software to restore your device. You will see things like a message that it is also validating with Apple. When you start the process don’t disconnect your mobile phone from your PC during this process.
5. When the phone recovery work is done, iTunes will tell you, you are not finished yet! You essentially restore your settings option and sync the whole thing. The iPhone needs to be restarted after recovery. Then you will see a message saying it needs to activate – wait a minute and it will tell you that the process is over.
6. As a final point, you’ll find two options one iTunes screen. “Set up as a new iPhone” or “Restore from backup. Then you have to recover your information from the backup option. Now select your device name from the breakup method. Probably, completing the breakup process need to take a few minutes, that’s why you should make sure as if your device doesn’t be disconnect during this time.
7. When the restore process will be finished the device will take restore automatically again. If iTunes is not set up to sync automatically, please manually do it now. This step is difficult: it transfers all your files, apps, music, and so on your device.
Recommended: How to Fix Antimalware Service Executable high CPU usage.
How To Reset iPhone Without Passcode and Computer
1. The following 4 steps will help you to reset the iPhone without passcode and computer with iMyipone lock wiper. The great advantage of this is that you don’t need iTunes or iCloud sync before. Compete for the whole procedure need 5-8 minutes. Follow our ways step by step below.
2. First of all, Download and install the iMyFone Lock Wiper on your computer and start it. At that point, press on the “Start Button”. Next, connect your locked iPhone to the computer via an Apple USB cable. You need to download it by taping the below button.
3. Automatically will detect your device. After Confirm your device and click download. It will be downloading and authenticate the firmware package for your device.
4. After the download is a complete Zip file, Extract the file (right-click on the zip file and Extract) and it will unpack the firmware.
5. When it’s done, click “Start Unlock Button” and then approve it.
6. Lock Wiper will unlock automatically reset it from your locked device. Lastly, wait a few seconds to its finish.
Bottom Line
Finally, if you want to restore your iPhone follow the steps without any hesitation. If you follow this procedure step by step I exactly sure you will succeed to restore your iPhone nicely without any issue. I hope you have found the expected answer to your question that how to reset iPhone 7 to factory settings. Now try this procedure and restore your device quickly. You can also read how to create a desktop shortcut for any game in Epic Games Launcher.