

Attention all Mac users! Are you struggling with limited storage space on your Macintosh HD? Do you have important data spread across multiple drives and want to consolidate it into one? Look no further, because, in this post, we will guide you on how to merge Macintosh HD and Macintosh HD – Data.
We’ll provide step-by-step instructions and helpful tips to ensure a seamless merge without losing any of your valuable data. So, if you’re ready to optimize your storage and simplify your digital life, keep reading to learn how to merge Macintosh HD and Macintosh HD – Data.
List of Contents
- How to Merge Macintosh HD And Macintosh HD – Data?
- Multiple Macintosh Hd – Data
- Merge Partitions Mac Without Losing Data
- How to Merge Partitions Mac Disk Utility
- Can’t Merge Partitions Mac
- How to Merge Partitions Mac Terminal
- How to Merge Partitions Mac Monterey
- Merge Bootcamp Partition With Mac
- How to Merge Partitions Mac High Sierra
- Why Do I Have Macintosh HD and Macintosh HD data?
- How Do I Merge Macintosh HD?
- Do I Delete Macintosh HD or Macintosh HD data?
- Can You Combine Two Hard Drives Together on Mac?
- Conclusion
How to Merge Macintosh HD And Macintosh HD – Data?
To merge two partitions on your Mac, specifically the “Macintosh HD” and “Macintosh HD – Data,” you can follow these steps:
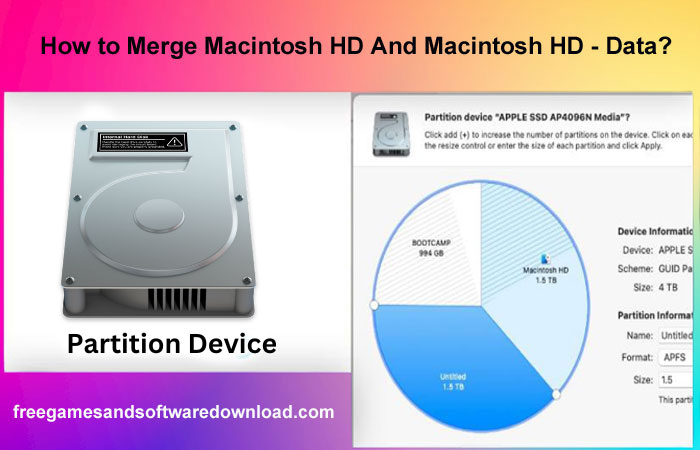
1. Open Disk Utility: Go to Applications > Utilities > Disk Utility.
2. Select the Main Drive: In Disk Utility, locate and select the “Macintosh HD” partition.
3. Choose the Partition tab: Click on the Partition tab in the main window.
4. Manage Partitions: You should see a graphical representation of your drive’s partitions. Click on the “+” icon below it to add a new partition.
5. Configure New Partition: When configuring the new partition, ensure that you allocate enough space to accommodate both “Macintosh HD” and “Macintosh HD – Data.” Adjust the size by dragging the partition edges.
6. Set Partition Format: Choose the format for your new partition. Ideally, select “Mac OS Extended (Journaled)” or “APFS” if your Mac is running on macOS High Sierra or later.
7. Rename and Apply Changes: Give your new partition a suitable name, like “Combined Macintosh HD,” and click on the Apply button to confirm the changes.
8. Merge Partitions: After applying the changes, your Mac will create a new partition. Now, to merge “Macintosh HD” and “Macintosh HD – Data,” follow these additional steps:
1. Open Terminal: Go to Applications > Utilities > Terminal.
2. Enter Command: Type the following command in Terminal: diskutil mergePartitions JHFS+ “Combined Macintosh HD” disk0s2 disk1s2.
Note: Replace “Combined Macintosh HD” with the name you assigned to the new partition.
Once you press enter, your Mac will start merging the two partitions. This process may take some time, depending on the size of the partitions and the speed of your Mac. It is important not to interrupt this process to avoid data loss or system instability.
During the merging process, your Mac will combine the contents of “Macintosh HD” and “Macintosh HD – Data” into the new “Combined Macintosh HD” partition. Once the process is complete, you will have a single partition with all your data consolidated.
After the merge is finished, it is recommended to restart your Mac to ensure that all changes take effect properly.
•Do I Install MacOS on Macintosh HD Or Macintosh HD Data?
Multiple Macintosh Hd – Data
Macintosh HD, or hard drive, is a vital part of any Mac computer. It stores all of your data, including your operating system, applications, and personal files. If something goes wrong with your Macintosh HD, it can be very difficult to access or even use your Mac.
There are a few different ways that you can have multiple Macintosh HDs. The most common way is to have two or more internal hard drives on your Mac. This gives you the ability to store more data on your computer, as well as providing redundancy in case one of the drives fails.
You can also connect external hard drives to your Mac for additional storage space. Finally, you can use cloud storage services like iCloud or Dropbox to store files off of your computer. Having multiple hard drives on your Mac is a great way to keep your data safe and increase the amount of storage space on your computer.
Be sure to back up all of your data regularly so that you don’t lose anything if one of the drives fails!
Merge Partitions Mac Without Losing Data
When you have multiple partitions on your Mac, it can be helpful to merge them into a single volume. This can make it easier to manage your files and keep your system organized. However, if you’re not careful, merging partitions can lead to data loss.
In this post, we’ll show you how to merge partitions without losing any data. There are a few different ways to merge partitions on a Mac. One option is to use Disk Utility, which is included with macOS.
To use Disk Utility, open the program and select the two partitions that you want to merge. Then click the “Merge” button at the bottom of the window. Another option is to use a third-party utility such as Paragon Partition Manager or EaseUS Partition Master Free Edition.
These programs offer more options and flexibility than Disk Utility, but they’re also more complex to use. If you follow these steps carefully, you should be able to merge your partitions without losing any data. However, it’s always a good idea to back up your important files before making any changes to your system.
•How to Connect Beats Earbuds to iPhone: A Complete Guide?
How to Merge Partitions Mac Disk Utility
Assuming you would like a blog post discussing how to merge partitions on a Mac Disk Utility: If you’re running out of space on your Mac’s hard drive, you may want to consider merging partitions. This can be done using the Disk Utility application that comes pre-installed on all Macs.
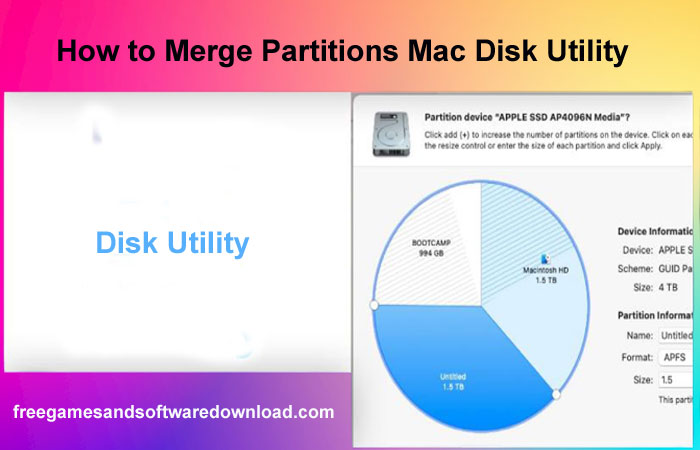
Here’s a step-by-step guide on how to do it:
1. Open the Disk Utility application. You can find this in the “Utilities” folder in your “Applications” folder.
2. Select the partition that you want to merge with another partition from the left sidebar. Then click on the “Partition” tab at the top of the window. 3. In the “Partition Layout” drop-down menu, select “Merge Partitions.”
4. Select the other partition that you want to merge with your first selected partition and click “OK.” 5Now, simply click on the “Apply” button at the bottom of the window and your partitions will be merged!
Can’t Merge Partitions Mac
If you have a Mac with multiple partitions, you may be wondering if you can merge them into a single partition. The answer is yes! Here’s how to do it:
First, open Disk Utility (located in /Applications/Utilities). Select the disk or volume that you want to modify from the left sidebar. Click the “Partition” button near the top of the window.
In the resulting dialogue, click on the “+” button to add a new partition. Enter the desired size for the new partition, then click “Apply.” Once the new partition has been created, select it and click on the “-” button to delete it.
This will merge it with the adjacent partition. Click “Apply” to confirm your changes. And that’s all there is to it! Merging partitions on a Mac is simple and straightforward using Disk Utility.
•How to Connect Airpods Max to PC: A Step-by-Step Guide
How to Merge Partitions Mac Terminal
Assuming you want to merge two partitions on a Mac:
1. Start by launching the Terminal application. You can find this in the Utilities folder, which is located in the Applications folder.
2. Once the Terminal window opens, you will need to enter the following command: diskutil mergePartitions JHFS+ NewVolume disk0s3 disk0s4. Keep in mind that you will need to change “NewVolume” to the name of your new volume, and “disk0s3” and “disk0s4” should be replaced with the actual identifiers for your partitions. These identifiers can be found by running the “diskutil list” command in Terminal.
3. Press Enter after typing in the command, and then wait for it to finish executing. This process could take a few minutes depending on how large your partitions are.
4. Once it’s done, you should now have a single partition that contains all of the data from both of your original partitions!
How to Merge Partitions Mac Monterey
Apple’s new MacOS Monterey operating system includes a number of changes and improvements, one of which is the ability to merge partitions on your Mac. If you’re not familiar with partitions, they are essentially separate sections of your hard drive that can be used to store different types of data. For example, you might have one partition for your operating system and another for your personal files.
Partitions can be useful if you want to keep certain types of data separate from others, but they can also be a bit of a pain to manage. If you have multiple partitions on your Mac, you may have noticed that it’s not always easy to move files between them. With Monterey, though, Apple has made it possible to merge partitions together so that you only have one big section for all of your data.
If you’re not sure whether merging partitions is right for you, here’s a look at some pros and cons: Pros: – Having fewer partitions can make it easier to manage your files since everything will be in one place.
Merging partitions can free up some space on your hard drive since each partition takes up its own amount of space even if it’s not full. This is especially helpful if you have an older Mac with a smaller hard drive.
Merge Bootcamp Partition With Mac
If you’re a Mac user who’s decided to take the plunge and install Windows 10 via Boot Camp, you may find yourself in need of some extra space. If that’s the case, you can follow these steps to merge your Boot Camp partition with your Mac partition without losing any data. Before we get started, it’s important to note that this process will only work if your Boot Camp partition is on the same drive as your Mac partition. If not, you’ll need to use a different method.
1. Backup Your Data Before doing anything else. It’s always a good idea to back up your data just in case something goes wrong during the process.
2. You can use Time Machine for this, or another backup solution of your choice. Once you’ve got a backup in place, you’re ready to proceed.
3. Resize Your Mac Partition.
4. In order to make room for the Boot Camp partition, we’ll need to resize our Mac partition first.
4. To do this, open Disk Utility (which can be found in Applications > Utilities) and select your main hard drive from the list on the left side of the window.
5. Then click on the “Partition” button near the top of the window and drag one of the existing partitions (likely named “Macintosh HD”) downwards so that it shrinks in size.
•What is Other in Android Storage and How to Delete It?
How to Merge Partitions Mac High Sierra
If you have multiple partitions on your Mac, you may want to merge them into a single volume. This can be useful if you want to create a single, large volume for storing data, or if you want to increase the size of an existing partition. Merging partitions on your Mac is relatively simple, and can be done using the Disk Utility application.
Here’s a step-by-step guide on how to do it:
1. Launch the Disk Utility application, which is located in the Utilities folder in your Applications folder.
2. Select the volume that you want to merge with another volume from the left sidebar.
3. Click on the Partition tab at the top of the window.
4. Click on the + button at the bottom of the window and select Add Volume from the drop-down menu that appears.
5. A new volume will appear in the left sidebar beneath your selected volume. Right-click or control-click on this new volume and select Merge with Selected Volume from the pop-up menu that appears.
6. Click on Apply in order to save your changes and begin merging the volumes. Depending on the number of files and their sizes.

Credit: www.pcmag.com
Why Do I Have Macintosh HD and Macintosh HD data?
If you’ve ever looked at your Mac’s hard drive, you may have noticed two different “Macintosh HD” volumes. So what’s the difference between “Macintosh HD” and “Macintosh HD – Data”? The answer is simple: one is for your system files, and the other is for your personal data.
Your system files are the files that are necessary for your Mac to run. They include things like your operating system, applications, and drivers. Basically, anything that you need in order to start up and use your computer lives on the “Macintosh HD” volume.
Your personal data, on the other hand, are all of the files that you create or save yourself. This can include documents, music, photos, and more. Basically, anything that isn’t required for your Mac to run lives on the “Macintosh HD – Data” volume.
So why do you need two separate volumes? Well, it’s a matter of convenience and security. Having a dedicated volume for your system files means that if something goes wrong with your personal data (say you accidentally delete a file), it won’t affect your ability to use your computer.
And if something goes wrong with your system files (like a virus), then only those files will be affected; your personal data will remain safe and sound.
How Do I Merge Macintosh HD?
If you’re running out of space on your Mac’s startup disk, one way to free up some room is to merge Macintosh HD with your other hard drive. This process will move all of the files and folders from Macintosh HD over to the other hard drive, leaving only a few system files behind. Here’s how to do it:
1. Back up your Mac. Before making any changes to your hard drives, it’s always a good idea to back up your data first. That way, if something goes wrong during the process, you’ll still have a copy of all your files. You can use Time Machine for this, or another backup method of your choice.
2. Choose the destination drive. In order for this process to work, you’ll need two hard drives connected to your Mac – one that will be the source (Macintosh HD) and one that will be the destination (the other hard drive). Make sure there’s enough space on the destination drive to accommodate all of the files from Macintosh HD – otherwise, you won’t be able to complete the merge successfully.
3. Open Disk Utility and select both drives. Once you’ve got everything backed up and have chosen which drive will be the destination, launch Disk Utility (located in /Applications/Utilities). Select both drives in Disk Utility’s sidebar – they should appear as separate entries with different volumes underneath them.
4. Click “Erase” on the destination drive. In order to merge the two drives together, we need to erase everything on the destination drive first. With both drives selected in Disk Utility, click on the Erase tab at the top of the window and then click Erase again when prompted (this will delete everything on the target drive).
5. Make sure you choose “Mac OS Extended (Journaled)” as the format – this is important! If you don’t see this option listed here, “Format:” dropdown menu below), try clicking on “View” > “Show All Devices”inDisk Utility’s toolbar first; this should make it appear.
6. ClickErase when prompted and then close Utility when it’s done.* 6OpenTerminaland enter some commands.
Do I Delete Macintosh HD or Macintosh HD data?
Assuming you are talking about uninstalling your Macintosh HD, the answer is no, you do not delete your Macintosh HD data. Your data is stored on a separate drive called the Recovery HD. To uninstall your Macintosh HD, simply drag it to the trash.
Can You Combine Two Hard Drives Together on Mac?
You can absolutely combine two hard drives on your Mac. In fact, it can be a great way to increase the storage capacity of your computer without having to invest in a whole new system. Here’s how to do it:
1. First, you’ll need to purchase an external hard drive enclosure. This will allow you to connect both drives together and access them as one unit.
2. Once you have the enclosure, connect both hard drives inside of it and then connect the enclosure to your Mac via USB or Thunderbolt.
3. Now open Disk Utility (located in Applications > Utilities). Select the first drive from the left sidebar and click on the “Erase” button at the top of the window. Choose “Mac OS Extended (Journaled)” from the format drop-down menu and click on “Erase.” This will format the drive for use with your Mac.
4. Next, select the second drive from the sidebar and click on “Erase” again. This time, choose “Mac OS Extended (Journaled, Encrypted)” from the format drop-down menu. This will encrypt your data for added security. Click on “Erase” once more to continue.
5. Finally, click on “View” > “Show All Devices” from within Disk Utility. You should now see both drives appear in the main window with their respective formats next to them (Mac OS Extended [Journaled] and Mac OS Extended [Journaled, Encrypted]). If everything looks good, close Disk Utility and restart your computer.
Upon reboot, open System Preferences > Startup Disk. Select Show all devices as boot volume option by holding down the Option key while clicking the Startup Disk icon. Doing this ensures that macOS boots correctly from either the internal or external startup disk selected.
That’s all there is to combining two hard drives on your Mac! By following these simple steps, you’ll be able to greatly expand your storage capabilities without spending a lot of money on a new system.
Conclusion
How to Merge Macintosh HD And Macintosh HD – Data? Merging Macintosh HD and Macintosh HD – Data can be a complex process, but with the right steps and precautions, it can be done successfully. By following the instructions outlined in this blog, you can combine the two partitions and optimize your storage space on your Mac.
Remember to back up all your important data before proceeding and proceed with caution to avoid any potential data loss. If you need further assistance or have any questions about merging Macintosh HD and Macintosh HD – Data, feel free to refer back to this blog or reach out for additional guidance.